You love cooking with fresh herbs. You hate paying three dollars for a plastic clamshell of basil that wilts before you use half of it. You look at your kitchen and see counter space swallowed by appliances, a bare wall above the sink, and zero room for another pot. A DIY vertical herb garden solves all of that. It turns dead wall space into a living pantry. It keeps parsley, thyme, and mint within arm’s reach while you chop and stir. And it costs a fraction of what those fancy store bought systems run. Whether you have a sprawling kitchen or a tiny galley, this project works. Let me show you how to build one this weekend.
A DIY vertical herb garden transforms unused wall space into a living pantry. This guide walks you through choosing the right location, picking the best herbs for indoor growing, and building a sturdy planter that fits your kitchen. You will learn which materials hold up to humidity, how to set up a simple watering routine, and which varieties thrive with limited light. Fresh herbs become part of your daily cooking without taking over your countertops.
Why Go Vertical in Your Kitchen
Counter space is prime real estate. A row of potted herbs might look charming at the nursery, but in your kitchen they crowd the cutting board, block the coffee maker, and collect dust behind the faucet. A vertical garden moves the greenery up where it belongs.
Vertical gardens also improve airflow around each plant. When herbs sit on a flat surface, the leaves closest to the counter often stay damp and develop mold. Hanging or stacking them lets air circulate freely. That means healthier plants and fewer pest problems.
There is also the simple joy of seeing your herbs every time you wash a dish or fill a glass. You remember to use them. You snip a few leaves for your scrambled eggs or your evening pasta. The garden becomes part of your cooking rhythm, not a neglected afterthought.
If you enjoy turning unused areas into functional features, you might also like these transform your space with simple DIY wall art ideas for the rest of your home.
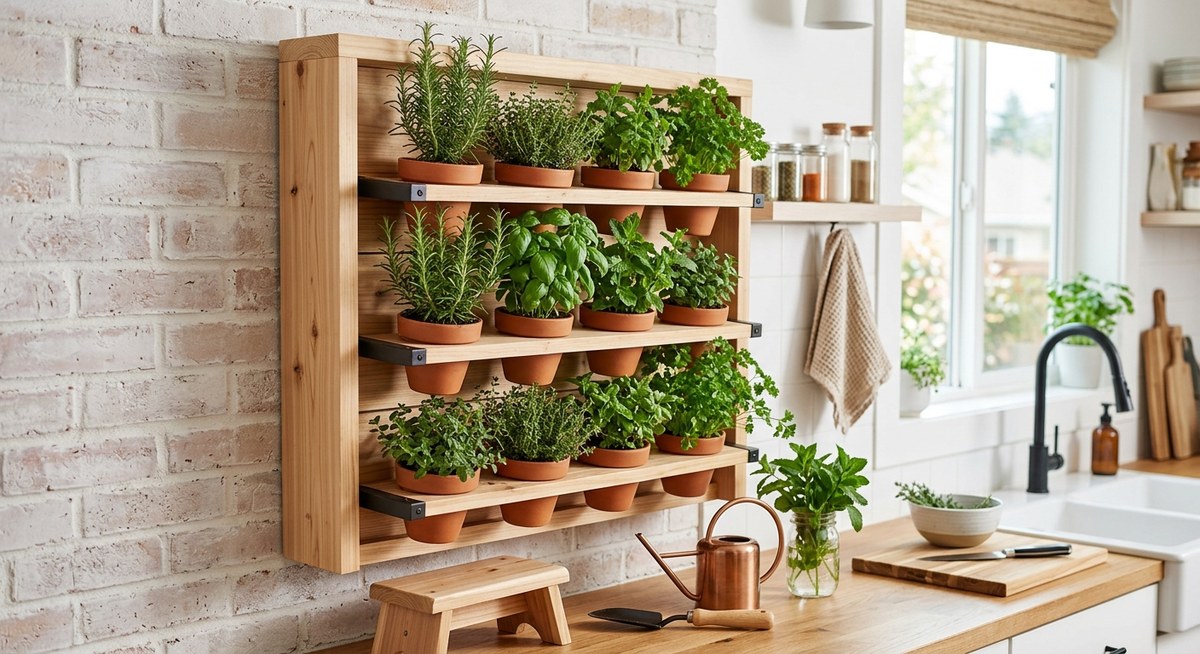
Choosing the Right Wall and Location
Not every wall works for an herb garden. You need three things: light, access, and structure.
Light is the most important. Most culinary herbs need at least four to six hours of direct sunlight each day. A south facing window is ideal. East or west facing windows can work, especially if you choose shade tolerant herbs like mint or parsley. If your kitchen has no good window, do not give up. Full spectrum LED grow lights are affordable and easy to mount above your planter. They use little electricity and produce almost no heat.
Access matters more than you think. Mount the garden near your main prep area, not over the stove where heat and grease will damage the leaves. A wall beside the sink or next to the refrigerator works well. You want to reach out, snip what you need, and get back to cooking.
Structure means the wall can hold the weight. A fully watered vertical garden can get heavy. Drywall alone may not support it without proper anchors. Always locate the studs or use heavy duty toggle bolts rated for at least fifty pounds. If you rent your home, consider a freestanding vertical system that leans against the wall instead of mounting into it.
Materials and Tools You Will Need
You can build a vertical herb garden from many materials. The simplest version uses a wooden pallet, landscape fabric, and a few basic tools. Here is what you need for a beginner friendly build.
- One wooden pallet (untreated, heat treated only) or a 2×4 foot piece of cedar lattice
- Landscape fabric or heavy duty weed barrier
- Staple gun with half inch staples
- Measuring tape and level
- Drill with wood drill bits
- Six to eight small terracotta pots or fabric grow pouches
- Potting mix formulated for herbs (light and well draining)
- A drip tray or plastic lining to protect your wall
- Heavy duty wall anchors or screws
You can swap materials based on what you have. A wooden wine crate, an old shoe organizer, or a metal grid from an office supply store all work. The principle stays the same: create pockets that hold soil and drain water without damaging your wall.
If you are new to building projects, check out these top 10 essential tools for successful DIY home projects before you start shopping.
Step by Step: Building Your Vertical Herb Garden
Follow these steps in order. Each one builds on the last, so do not skip ahead.
-
Prepare the backing board. Cut your pallet or lattice to the desired size. A width of twenty four inches and a height of thirty six inches fits most kitchen walls. Sand rough edges to avoid splinters. If you use a pallet, remove any loose boards and reinforce the frame with extra screws.
-
Attach the landscape fabric. Lay the frame flat face down. Staple landscape fabric across the entire back side. This creates a barrier that holds soil in while letting excess water drain. Fold the edges over and staple every two inches for a tight seal.
-
Create the planting pockets. Flip the frame face up. Staple additional strips of fabric horizontally across the front, leaving gaps between them. Each strip should form a shallow pocket when you pull it away from the frame. Space the pockets ten to twelve inches apart so plants have room to grow.
-
Install the drip tray. Attach a thin plastic tray or a folded piece of pond liner along the bottom edge. Angle it slightly forward so water runs into a removable catch tray instead of down your wall.
-
Mount the frame to the wall. Hold the frame in position and use a level to check alignment. Mark the screw locations through the frame. Drill pilot holes into wall studs or install heavy duty anchors. Secure the frame with screws rated for the combined weight of wet soil and pots.
-
Fill the pockets with soil. Dampen your potting mix before filling each pocket. This prevents dry soil from repelling water later. Fill each pocket about three quarters full, leaving room for the plant root ball.
-
Plant your herbs. Remove each herb from its nursery pot and gently loosen the roots. Place one plant per pocket. Backfill with soil and press down gently to remove air pockets. Water each plant thoroughly from the top.
-
Set up a watering system. A small watering can with a narrow spout works fine. For larger gardens, consider a drip irrigation kit with a timer. Run the tubing behind the frame so it stays hidden.
Best Herbs for a Kitchen Vertical Garden
Not all herbs thrive in a vertical system. The best choices have shallow root systems and tolerate being harvested often.
- Basil (sweet or Genovese)
- Thyme (English or lemon)
- Oregano (Greek)
- Parsley (flat leaf or curly)
- Mint (spearmint or peppermint)
- Chives
- Cilantro
- Sage
- Rosemary (dwarf varieties only)
Avoid dill and fennel. They develop deep taproots and grow too tall for most vertical setups. Also avoid lavender unless you have exceptionally bright light and very dry conditions.
“The secret to a thriving vertical herb garden is choosing plants that match your cooking style, not just your aesthetic. If you never cook with oregano, do not plant it. Grow what you actually use, and you will naturally remember to water and harvest.” Mia Chen, urban gardening educator and author of “The Countertop Harvest”
Common Mistakes and How to Avoid Them
Even experienced gardeners make errors when they first build a vertical system. This table shows the most frequent problems and their solutions.
| Mistake | Why It Happens | How to Fix It |
|---|---|---|
| Overwatering | Soil in vertical pockets drains slower than pots because gravity compacts it | Mix perlite or coarse sand into the potting soil to improve drainage |
| Leaves turning yellow | Too little light or poor air circulation | Move the garden to a brighter spot or add a grow light; space plants farther apart |
| Mold on the wall behind the frame | No drip tray or insufficient ventilation | Add a plastic backing and leave a half inch gap between the frame and the wall using spacers |
| Herbs taste bitter | Plants are stressed from inconsistent watering | Set a regular watering schedule; use a moisture meter to check soil before watering |
| Plants grow leggy and thin | Not enough direct sunlight | Rotate the garden orientation or supplement with an LED grow light for four hours daily |
Watering and Maintenance for Long Term Success
Vertical gardens dry out faster than ground level planters because air moves across all sides of the soil. Check moisture every other day. Stick your finger into the soil up to the second knuckle. If it feels dry, water until you see a few drops emerge from the bottom of the pocket.
Fertilize every two weeks during the growing season with a half strength liquid fertilizer. Fish emulsion works well and smells less than you think once it is diluted. Stop fertilizing in late fall when growth naturally slows.
Harvest often. Regular trimming encourages bushier growth and prevents flowering, which makes herbs taste bitter. Snip no more than one third of the plant at a time. Use clean scissors and cut just above a leaf node.
Keep an eye out for aphids and spider mites. A strong spray of water from the sink sprayer usually knocks them off. If the problem persists, wipe the leaves with a diluted solution of neem oil and water.
Making the Garden Match Your Kitchen Style
A vertical herb garden does not have to look purely utilitarian. Paint the wooden frame the same color as your cabinets for a seamless look. Use terracotta pots for a warm Mediterranean feel, or white ceramic pots for a clean modern aesthetic. You can even attach small chalkboard labels to each pocket so you always know which herb is which.
If you enjoy combining function with style, you might also appreciate these easy DIY storage solutions for small spaces for other parts of your home.
What to Do When You Travel
A vertical herb garden needs attention every few days. If you go on vacation, group the herbs in a shaded spot and water them deeply before you leave. Set the drip tray to catch excess water so they do not sit in moisture. For trips longer than a week, ask a neighbor to water, or invest in a simple drip timer that connects to your kitchen faucet.
You can also take cuttings before you leave. Place the stems in a glass of water on the counter. Most herbs will root within a week, giving you new plants to transplant when you return.
Bring Fresh Herbs Into Every Meal
A DIY vertical herb garden changes more than your kitchen wall. It changes how you cook. You will reach for fresh basil instead of dried. You will garnish with chives just because they are there. You will make pesto from your own plants and taste the difference.
Start small. Pick two or three herbs you use most often. Build a simple frame. Mount it in the right spot. Water consistently. Within a few weeks, you will have a lush, productive garden that cost you very little and gives back every single day.
And if you want more ways to make your home work better for the way you live, check out these 5 trendy DIY projects to try in 2026. Your next project is probably already on your mind.