If you have ever killed a houseplant by overwatering or forgotten to turn on the grow light for your seedlings, you already know the frustration. Off-the-shelf smart gardens promise convenience, but they often cost hundreds of dollars and limit you to a single brand’s seed pods. The smarter move? Build your own. A DIY smart garden system gives you total control over components, cost, and growing methods. You can automate watering, lighting, and monitoring using affordable microcontrollers, sensors, and basic plumbing skills. Best of all, you will learn exactly how your plants tick while saving money. Let’s walk through the process so you can start growing fresh herbs, greens, or even peppers without the guesswork.
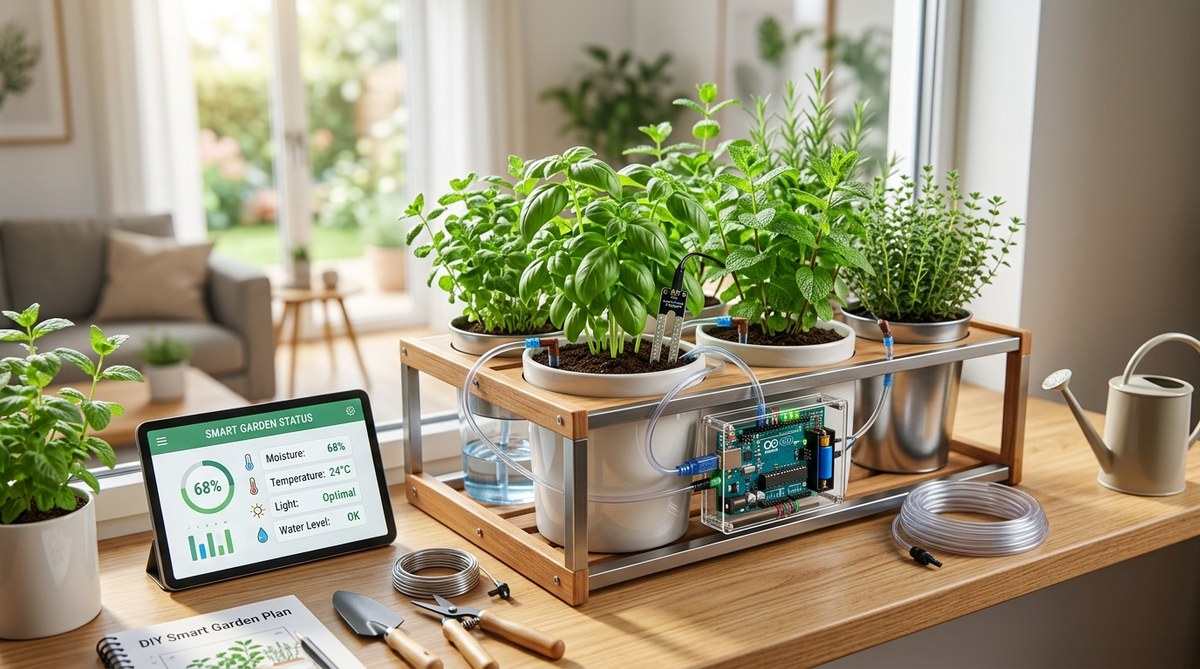
A DIY smart garden system puts you in charge of automation. You can water your plants only when the soil dries out, schedule grow lights to mimic sunrise, and track temperature and humidity from your phone. The core ingredients are a microcontroller, sensors, a relay module, a water pump, and a power supply. Total cost runs between $50 and $150, far less than store-bought units. No advanced coding skills are required. With a weekend of soldering and a free afternoon of programming, you will have a garden that practically takes care of itself.
Why Build Your Own Smart Garden Instead of Buying One
Store-bought smart gardens look great on a countertop, but they come with hidden costs. Proprietary seed pods can run $3 to $5 each, and the light panels are often too weak for fruiting plants like tomatoes. A custom build lets you choose the exact light spectrum, water flow rate, and sensor accuracy. You can also expand the system later. Add more pots, swap in a larger water reservoir, or integrate a webcam to watch your basil grow while you are at work. If something breaks, you replace a $5 part instead of trashing the whole unit. For the tech-savvy gardener, the flexibility is worth every minute of setup time.
Core Components You Will Need
Before you grab a soldering iron, gather these parts. Most are available on Amazon or at your local electronics store.
- Microcontroller (Arduino Uno, ESP32, or Raspberry Pi Pico). The ESP32 is a strong choice because it has built-in Wi-Fi and costs about $10.
- Soil moisture sensor (capacitive type, not resistive, to avoid corrosion).
- Temperature and humidity sensor (DHT22 or BME280). BME280 also measures barometric pressure.
- Relay module (2 channel minimum) to switch a water pump and grow light on and off.
- Submersible water pump (12V DC, about 3 to 5 watts). Match the pump to the height you need to lift water.
- Grow light (full spectrum LED strip or a panel). Aim for at least 30 watts for a small herb garden.
- Power supply (12V/2A for pump and lights, plus 5V for the microcontroller).
- Breadboard and jumper wires for prototyping. A perfboard and soldering kit for a permanent build.
- Water tubing and a reservoir (a 2 gallon bucket works fine).
- Optional: RTC module (DS3231) if you want the system to run timers even without internet.
Step by Step: Building Your Own DIY Smart Garden System
Follow these numbered steps to go from parts pile to working automated garden. Take your time on the wiring; a bad connection can cause sensor misreads.
-
Assemble the sensor circuit. Connect the soil moisture sensor’s VCC and GND to the microcontroller’s 3.3V and GND pins. The analog output pin goes to an analog input (GPIO 34 on ESP32). For the DHT22, use a digital pin (GPIO 5) with a 10k pull-up resistor if needed. Double check polarity before powering up.
-
Wire the relay module. The relay module has two or more channels. Connect the control pins to two digital outputs (GPIO 13 for pump, GPIO 12 for light). The relay’s common (COM) terminal goes to the positive wire of the pump. The normally open (NO) terminal goes to the pump’s other wire. Repeat for the grow light. Never connect the relay’s high voltage side while the power is on.
-
Set up the water pump and tubing. Place the pump at the bottom of the reservoir. Attach a length of tubing that reaches each plant pot or a drip manifold. If you are using a deep water culture system, you may need an air stone instead. Test the pump in a bowl of water before final assembly.
-
Program the microcontroller. Use the Arduino IDE or PlatformIO. Write a simple loop: read the moisture sensor every 30 seconds. If the soil is dry (analog value below a threshold), turn on the relay for the pump for 10 seconds. Read the DHT22 every minute. If room temperature exceeds 85°F, turn on a small fan. If the sensor value suggests normal conditions, keep lights on a 16/8 schedule using the RTC or a Wi-Fi time sync. Hundreds of example sketches are available on GitHub.
-
Enclose and mount everything. Place the electronics in a weatherproof project box. Run the sensor wires through a small cable gland. Attach the grow light above the plants (6 to 12 inches). Set the reservoir beside the pots or below the growing tray. Test all functions for 24 hours before trusting it with your seedlings.
Choosing the Right Growing Method for Your System
Your smart garden can support several soil free or soil based approaches. Each has trade offs. The table below compares the three most practical methods for a DIY build.
| Method | Water Delivery | Pros | Cons |
|---|---|---|---|
| Drip irrigation (soil) | Timer controlled pump drips water onto each pot | Works with standard potting soil; easy to set up; cheap | Soil can compact; needs drainage; sensor can get false readings |
| Deep water culture (soilless) | Air stone aerates nutrient rich water; roots hang in solution | Rapid growth; very simple plumbing; no soil mess | Requires pH/EC monitoring; plants can drown during power outage |
| Wick system (soilless) | Capillary wick draws water from reservoir to growing medium | No pump needed (passive); silent; ideal for small herbs | Slower growth; limited to small plants; wick can clog |
If you are new to hydroponics, start with a wick system for a single herb plant. Once you see how the sensors behave, upgrade to drip irrigation for a larger setup.
Common Mistakes and How to Avoid Them
Even experienced DIYers hit snags. Watch out for these issues.
- Using resistive moisture sensors. They corrode in a week. Spend a couple extra dollars on capacitive sensors.
- Placing the sensor too close to the water source. It will always read wet and never trigger the pump. Put it halfway down the pot, away from the drip line.
- Overlooking power supply ratings. A 500mA supply will brown out when the pump and relay activate simultaneously. Use a 2A or larger supply for the pump circuit.
- Skipping the level sensor. If the reservoir runs dry, the pump will burn out. Add a float switch or a water level sensor that shuts off the pump when water is low.
- Writing code without error handling. The DHT22 sometimes returns NaN. Wrap readings in a simple try/except (or if statement) to avoid a frozen system.
Expert Advice: “Walk before you run. Start with one plant and one actuator. Once the code is stable and the plant is happy, add more sensors and pumps. Trying to automate a six pot system on the first weekend usually leads to fried electronics and sad leaves.” — Veronica Klein, hardware engineer and urban gardener
Expanding Your Smart Garden After the First Build
Once the basic system is running, you can add features that make it even more self sufficient. A Wi-Fi enabled ESP32 lets you send data to a free dashboard like Blynk or MQTT. Check moisture levels from your phone while you are at the grocery store. Integrate a weather forecast API so the system skips watering if rain is expected that afternoon. Add a camera module (ESP32 CAM) to take a daily time lapse of your plants growing. If you enjoy the electronics side, consider building a second system for a friend. The knowledge you gained applies to other DIY projects too. For example, you might also enjoy learning how to Transform Your Space with Simple DIY Wall Art Ideas to decorate your growing area.
A well stocked tool kit makes any build smoother. If you are just starting out in electronics, check out our list of Top 10 Essential Tools for Successful DIY Home Projects. For more creative inspiration, you can browse 5 Trendy DIY Projects to Try in 2026 and see how a smart garden fits into a larger maker lifestyle.
Tweak, Test, and Enjoy Your Automated Garden
A DIY smart garden system is never truly finished. You will always find a better way to mount the sensor, a more efficient pump schedule, or a new plant variety that challenges your design. That is the beauty of building it yourself. You learn something every time a leaf curls or a moisture reading surprises you. Start with one basil plant. Let the system water it while you sleep. When you see the first true leaves push through the growing medium, you will know you have cracked the code. The payoff is not just fresh herbs on your dinner plate. It is the satisfaction of a machine you built from scratch, working in harmony with nature.