Your living room is looking good, but that fiddle leaf fig on the floor feels like a missed opportunity. You have seen the plant stands at the big box stores, the ones with the price tags that make you wince. A simple metal tripod runs sixty bucks. A solid wood mid-century stand? That is closer to two hundred. The good news is that you can build your own version for under thirty dollars, and you do not need a packed workshop or years of experience to do it. This guide shows you exactly how to build a modern DIY plant stand using tools you probably already own. The whole project takes a single afternoon.
Build your own modern plant stand with just a few basic tools and materials. Create a stylish piece of home decor that costs a fraction of retail prices. This step by step guide walks you through everything, from selecting lumber to applying the finish. You don’t need a workshop or advanced skills. Just follow along, and you will have a beautiful plant stand ready for your favorite indoor plants by the end of the weekend.
Why Build Your Own Plant Stand
Buying furniture is convenient, but building your own gives you total control over size, style, and material. A modern DIY plant stand lets you match the exact height your plant needs. Some monstera varieties look best at thirty inches tall, while trailing pothos works better on a lower shelf. When you build it yourself, you decide the dimensions.
Cost is another big reason. A well made wooden plant stand from a retailer can cost anywhere from eighty to two hundred dollars. The lumber for this project runs about twenty five dollars. You also get the satisfaction of saying, “I made that,” when guests compliment your decor. If you are new to woodworking, this project is a great confidence builder. It uses straight cuts only, so you can work with a hand saw or a circular saw without worrying about angles.
Tools and Materials You Need
Before you start, gather everything in one spot. This keeps the build smooth and prevents mid-project trips to the hardware store.
Materials
- One 8-foot 1×12 pine board (the top and shelf)
- One 6-foot 2×2 pine board (the legs)
- Wood glue
- 1.5-inch wood screws
- 120-grit and 220-grit sandpaper
- Wood stain or paint of your choice
- Clear matte polyurethane (optional but recommended)
Tools
- Tape measure
- Pencil
- Hand saw or circular saw
- Power drill with screwdriver bits
- Clamps (at least two)
- Sanding block or orbital sander
- Level
- Safety glasses and a dust mask
If you are missing a tool or two, check out our guide on the top 10 essential tools for successful DIY home projects. It covers budget-friendly options that will serve you for years.
Step by Step Building Process
Follow these steps in order. Each one builds on the last, so do not skip ahead.
1. Cut Your Wood to Size
Measure twice, cut once. That old saying exists because it saves you from wasting lumber. For this plant stand, you need these pieces:
- One piece for the top: 12 inches long from the 1×12 board
- One piece for the lower shelf: 10 inches long from the 1×12 board
- Four legs: each 24 inches long from the 2×2 board
Mark your cut lines with a pencil and a square. If you are using a hand saw, go slowly and keep the blade straight. A circular saw gives you cleaner cuts, but either works fine. Sand the cut edges with 120-grit sandpaper to remove splinters.
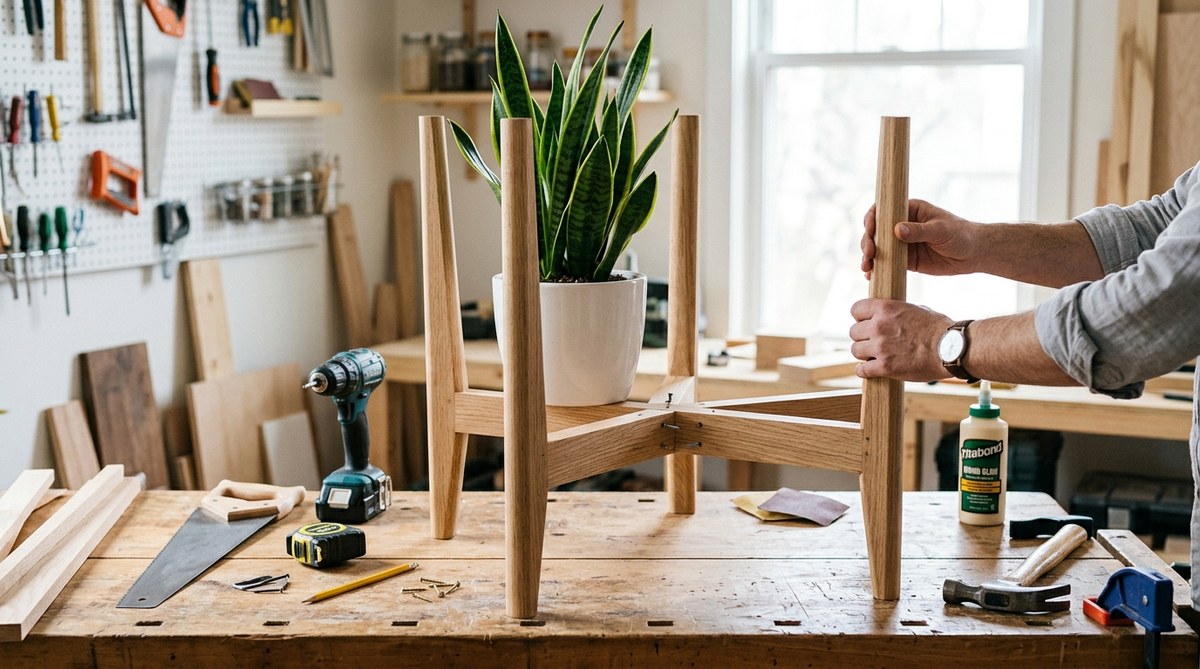
2. Build the Top Section
The top is where your plant will sit, so it needs to be sturdy. Lay your 12-inch 1×12 piece flat on a work surface. Take two of the 24-inch legs and position them at the back corners, about half an inch from the side edges. The legs should extend upward from the bottom face of the top piece.
Apply wood glue to the top of each leg where it meets the board. Clamp them in place. Pre-drill two holes through the top board into each leg, then drive 1.5-inch screws. The glue gives you holding power, and the screws add mechanical strength. Repeat the same process for the front legs.
Expert Tip: Pre-drilling is not optional when working with pine. Pine splits easily, especially near the edges. A 1/8-inch drill bit works well for pre-drilling. This small step saves you from ruining a piece and having to start over.
3. Attach the Lower Shelf
Flip the assembly so it rests on the legs. Measure down from the bottom of the top board to where you want the shelf. A distance of 10 inches works well for most plants, but you can adjust based on your pot sizes.
Cut two small support cleats from scrap wood. Each cleat should be about 2 inches long and 1 inch wide. Glue and screw these cleats to the inside faces of the side legs at your chosen height. Let the glue set for a few minutes. Then place the 10-inch shelf piece on top of the cleats and secure it with screws through the cleats into the shelf. The shelf gives you space for a smaller secondary plant or decorative objects.
4. Sand Everything Smooth
Now is the time to sand. Do it before assembly if you prefer, but sanding after assembly lets you smooth any uneven joints. Start with 120-grit sandpaper to remove roughness and any glue squeeze-out. Then switch to 220-grit for a smooth, silky surface. Pay extra attention to the corners and edges, as these are the areas you will touch most often.
5. Apply Your Finish
The finish protects the wood and gives your plant stand its final look. Wipe down the entire piece with a tack cloth to remove dust. Apply wood stain with a clean cloth or brush, working in the direction of the grain. Let it sit for about five minutes, then wipe off the excess. Allow the stain to dry for at least four hours.
If you prefer paint, use a high quality interior latex or chalk paint. Two thin coats give a better result than one thick coat. After the stain or paint is fully dry, apply a clear matte polyurethane. This step is important because plant watering can lead to spills, and the polyurethane protects the wood from moisture.
Design Options and Common Mistakes
Every builder makes mistakes, especially on the first project. The table below covers the most common issues and how to avoid them.
| Technique | Why It Matters | Common Mistake to Avoid |
|---|---|---|
| Pre-drilling holes | Keeps the wood from cracking | Driving screws directly into soft pine |
| Using a level | Ensures the stand does not wobble | Leveling only one direction |
| Sanding between coats | Creates a smooth, professional finish | Applying finish over rough or dusty wood |
| Wood glue with screws | Doubles the joint strength | Relying on screws alone |
| Measuring from the same reference point | Keeps all legs equal height | Measuring each leg from a different edge |
A wobbly plant stand is the most frequent complaint from first time builders. The fix is simple. Check every leg with a level before the glue dries. If one leg sits higher, sand the bottom until it matches. A few minutes of adjustment saves you from a frustrating display.
Expert Tips for a Professional Look
You want your modern DIY plant stand to look like it came from a boutique, not a garage. Small details make that difference.
First, take time on the edges. A sharp 90-degree corner feels industrial, while a slightly rounded edge feels soft and refined. Use your sanding block to ease the edges by about 1/16 of an inch. This is called breaking the edge, and it is one of the easiest ways to elevate a build.
Second, match your finish to your room. For a warm, Scandinavian look, use a light wash of white stain over the pine. For something bolder, try a deep walnut or charcoal stain. Paint works well if you want a pop of color. A matte finish almost always looks more modern than a glossy one.
Third, consider the legs. Straight 2×2 legs work perfectly, but you can swap them for metal hairpin legs if you want an industrial look. Hairpin legs are available online for about fifteen dollars for a set of four. They require no additional tools, just screws into the bottom of the top board.
If you enjoy this style of project, you might also like learning how to transform your space with simple DIY wall art ideas. It uses the same mindset of building custom pieces on a budget.
Finishing Your Plant Stand
Once the polyurethane is dry, your plant stand is ready. Flip it upright and place it on a flat surface. Check for wobbles one last time. If everything looks good, bring in your plant.
But before you set the pot directly on the wood, add a small barrier. A clear rubber mat cut to size or a cork trivet protects the finish from water rings. This is especially important if your pot has a drainage tray underneath. Moisture trapped against the wood can damage the finish over time.
You can also add felt pads to the bottom of the legs. These pads protect your floors from scratches and make the stand easy to slide around when you rearrange your space. Felt pads cost a couple of dollars at any hardware store.
Where to Put Your New Plant Stand
Now comes the fun part. A modern DIY plant stand works in almost any room. Place it near a south facing window for sun loving plants. Group it with other stands at different heights to create a layered plant display. In a bedroom corner, it becomes a focal point that adds life to an empty space.
Your stand can also double as a small side table. Put a lamp on it next to a reading chair. Use it to hold a stack of books and a candle. The clean lines of the design fit right in with modern, mid-century, and even farmhouse decor styles.
If you are looking for more ways to fill your home with handmade pieces, check out these 5 trendy DIY projects to try in 2026. Each one builds on the same basic tool skills you used here.
Your New Skills and Next Projects
Building a modern DIY plant stand teaches you more than just woodworking. It shows you that good design does not have to cost a lot. It proves that you can create something beautiful with your own hands and a few basic tools. Every time you walk past that plant stand, you will remember that you built it. That feeling never gets old.
Use the same techniques from this project to build a matching pair of stands. Make one tall and one short for visual variety. Experiment with different stains and paint colors. You now have the foundation to tackle bigger furniture projects, like a side table, a bench, or even a small bookshelf.
So grab your tools, pick out your lumber, and start building. Your plants deserve a proper home, and you deserve the pride of making it yourself.