
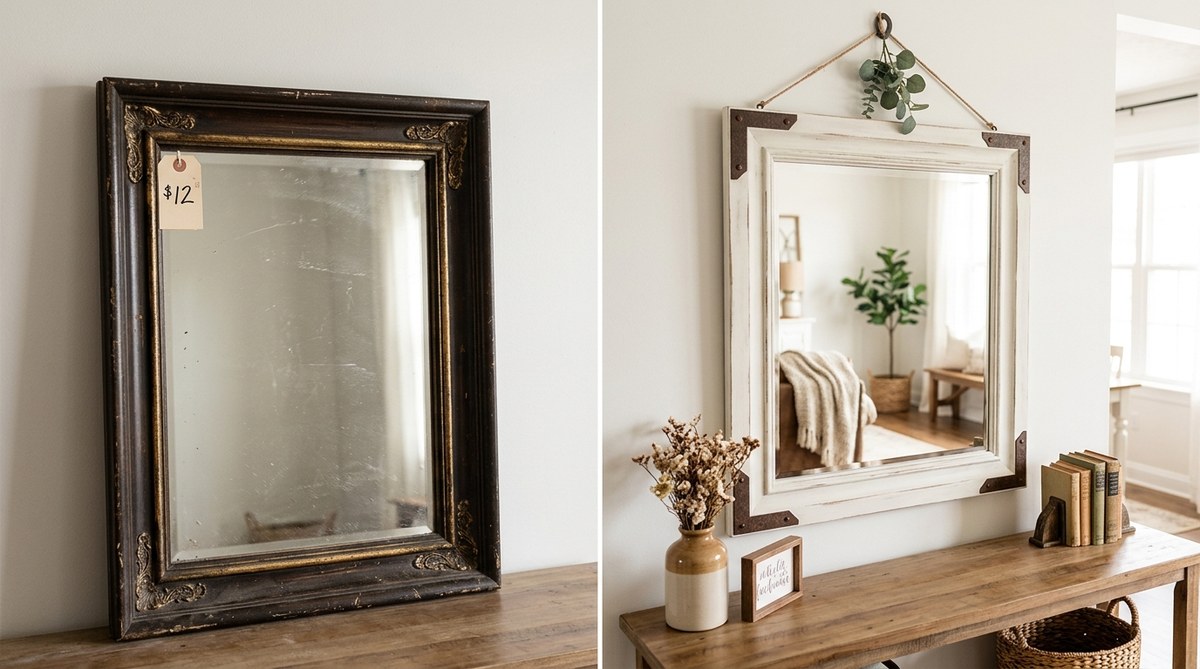
You walk into a thrift store on a Saturday morning, coffee in hand, and spot a sad, outdated mirror leaning against a shelf. The frame is scratched. The finish is dated. But the shape is solid, and the glass is intact. You see potential. That mirror, with a little creativity and some basic supplies, can become the centerpiece of your living room or entryway. A DIY farmhouse mirror thrift store makeover is one of the most rewarding projects you can tackle. It saves money, reduces waste, and gives your home that cozy, rustic charm everyone loves.
A thrift store mirror can become a farmhouse statement piece with just a few supplies and a weekend of work. Focus on choosing the right frame shape, applying a weathered paint or stain finish, and adding simple wood trim. The result is a custom look for under $30 that rivals expensive decor from big box stores.
Finding the Right Mirror at the Thrift Store
Not every thrift store mirror is a good candidate. You want a piece that has good bones. Look for solid wood frames, even if the paint is peeling. Avoid mirrors with cracks in the glass, because replacing glass is tricky and expensive. The size matters too. A mirror that is too small can get lost on a wall. Aim for something at least 24 inches wide or tall. Oval and rectangular shapes work best for the farmhouse style. Round mirrors can work, but they need a wider frame to pull off the look.
Check the back of the mirror. Make sure the backing board is intact and not water damaged. If the frame is wobbly, you can reinforce it with wood glue and corner brackets. Thrift stores often price mirrors under $15. That is your sweet spot. If you find one for $5, even better. The budget for the whole project should stay under $30.
Supplies You Will Need for This Makeover
Gather your materials before you start. Nothing kills momentum like a trip to the hardware store mid project. Here is your list.
- Sandpaper (medium grit 120 and fine grit 220)
- Painter’s tape
- Drop cloth or cardboard
- Wood filler (for any dents or holes)
- Primer (water based is fine)
- Chalk paint in a farmhouse neutral (white, cream, or light gray)
- Wood stain (weathered gray or dark walnut)
- Paintbrushes (a 2 inch flat brush and a small detail brush)
- Lint free cloth for wiping stain
- Optional wood trim (to add dimension to a flat frame)
- Wood glue and brad nails if adding trim
- Clear matte sealer or finishing wax
If you want to get into the full mindset of home improvement, check out our guide on top 10 essential tools for successful DIY home projects. It will help you stock your toolbox for future builds.
Step by Step: The DIY Farmhouse Mirror Process
Follow these steps in order. Rushing leads to mistakes.
1. Prep the Frame
Lay the mirror face down on a soft surface. Use painter’s tape to cover the glass completely. You do not want paint or stain on the mirror itself. Remove any old hardware like hanging brackets. Set them aside. Sand the entire frame. Start with medium grit to remove the old finish. Then switch to fine grit for a smooth surface. Wipe away dust with a damp cloth.
2. Repair and Fill
Inspect the frame for scratches, dents, or holes. Use wood filler to patch any damage. Let it dry fully. Sand those spots again with fine grit. A smooth frame makes the final paint job look professional.
3. Prime the Frame
Apply a thin coat of primer. This helps the chalk paint stick and prevents the old color from bleeding through. Let the primer dry for at least two hours.
4. Apply the Base Color
Use chalk paint for a matte, vintage look. Apply two thin coats, letting each coat dry completely. Do not glob it on. Thin coats prevent drips and brush marks. If you want a distressed finish, stop here. If you want a stained wood accent, move to the next step.
5. Add a Washed Stain Effect (Optional)
For a true farmhouse feel, paint the frame white, then lightly sand the edges to let the original wood or stain peek through. You can also apply a weathered gray stain over the paint. Wipe it on with a cloth, then wipe off the excess. This creates depth.
6. Attach Wood Trim (If Desired)
Flat frames benefit from added dimension. Cut strips of pine trim to fit the inner edge of the frame. Glue them in place and secure with brad nails. Fill the nail holes with wood filler. Paint or stain the trim to match the frame.
7. Seal and Protect
Apply a clear matte sealer or furniture wax. This protects the finish from humidity and dust. Let it cure for 24 hours before hanging.
8. Remove the Tape and Reattach Hardware
Peel off the painter’s tape carefully. Reattach the original hanging brackets or install new D ring hangers. Make sure the mirror is secure.
Common Mistakes and How to Avoid Them
Even experienced DIYers make errors. Here is a table of the most common mistakes and the simple fixes.
| Mistake | Why It Happens | How to Fix It |
|---|---|---|
| Paint drips on the glass | Painter’s tape was not pressed down firmly | Use a credit card to burnish the tape edges |
| Brush strokes in the paint | Paint was too thick or brush was dry | Thin the paint with a splash of water |
| Frame looks too shiny | Wrong sealer type was used | Switch to a matte finish wax |
| Stain looks blotchy | Wood was not sanded evenly | Sand again and apply a wood conditioner first |
| Mirror feels loose in the frame | Original backing is weak | Add small L brackets to secure the glass |
Choosing the Right Finish for Your Space
Not every room calls for the same finish. Think about where the mirror will hang.
- Entryway or mudroom: Go with a heavily distressed white finish. It hides dirt and feels welcoming.
- Living room: A dark walnut stain with a white trim creates contrast. It feels more polished.
- Bathroom: Use a sealed, semi gloss paint. Bathrooms have moisture. A matte finish can stain over time.
- Bedroom: Soft gray wash with minimal distressing. It keeps the room calm.
Farmhouse style is flexible. You can lean more rustic or more modern. Both work. The key is the weathered, lived in look. For more ideas on updating your space, read our article on how to upcycle old furniture into stunning statement pieces.
How to Style Your Finished Farmhouse Mirror
Once your mirror is complete, placement matters. Hang it at eye level. In most homes, that means the center of the mirror sits at 57 to 60 inches from the floor. If you hang it above a console table, leave 6 to 8 inches of space between the table top and the bottom of the frame.
Add decor around the mirror to complete the look. A wreath made of dried eucalyptus or a simple macrame hanger works well. You can also lean the mirror against a wall for a casual, layered effect. This works great in a bedroom corner or above a dresser.
Expert tip: Use a mirror in a dim hallway to bounce natural light around the room. Farmhouse mirrors with thick frames add architectural interest where there was none.
Alternative Techniques for a Unique Look
You do not have to stick to paint. Try these variations.
- Decoupage the frame: Use pages from an old book or sheet music. Mod podge them onto the frame, then seal with matte varnish.
- Add a metal accent: Attach a thin metal band or galvanized steel trim to the outer edge. It gives an industrial farmhouse vibe.
- Use milk paint: Milk paint creates a chalky, authentic antique finish. It chips naturally over time, which adds character.
- Stencil a pattern: Use a farmhouse style stencil on the corners of the frame. Think simple stars or geometric lines.
Each of these methods keeps the project affordable. The total cost remains under $30 if you already have basic tools. If you are new to DIY and want to build confidence, try our 5 budget friendly DIY projects to upgrade your home this season.
Why Thrift Store Mirrors Are Perfect for This Project
New farmhouse mirrors from home decor stores can cost $150 or more. A thrift store mirror costs a fraction of that. The frames are often made from real wood, which takes paint and stain beautifully. Mass produced mirrors today use MDF or plastic. You cannot get the same distressed look on those materials.
Thrift store mirrors also have history. A 1970s oval mirror or a 1990s rectangular mirror can be transformed into something fresh. You are rescuing a piece from the landfill and giving it a second life. That feels good.
If you enjoy this kind of project, you might also like learning how to build a rustic wooden sign for your front porch this weekend. Both projects use similar materials and techniques.
Your Weekend Project Starts Now
A thrift store mirror is not just a bargain. It is a canvas. With sandpaper, paint, and a few hours of effort, you can create a farmhouse statement piece that looks custom made. The process is forgiving. Mistakes add character. The finished mirror will be a conversation starter every time someone walks into your home.
So grab that $8 mirror you spotted last weekend. Pick up some chalk paint on the way home. Clear off your work table. By Sunday evening, you will have a beautiful, unique piece that cost you less than a dinner out. That is the kind of win every DIYer loves.