
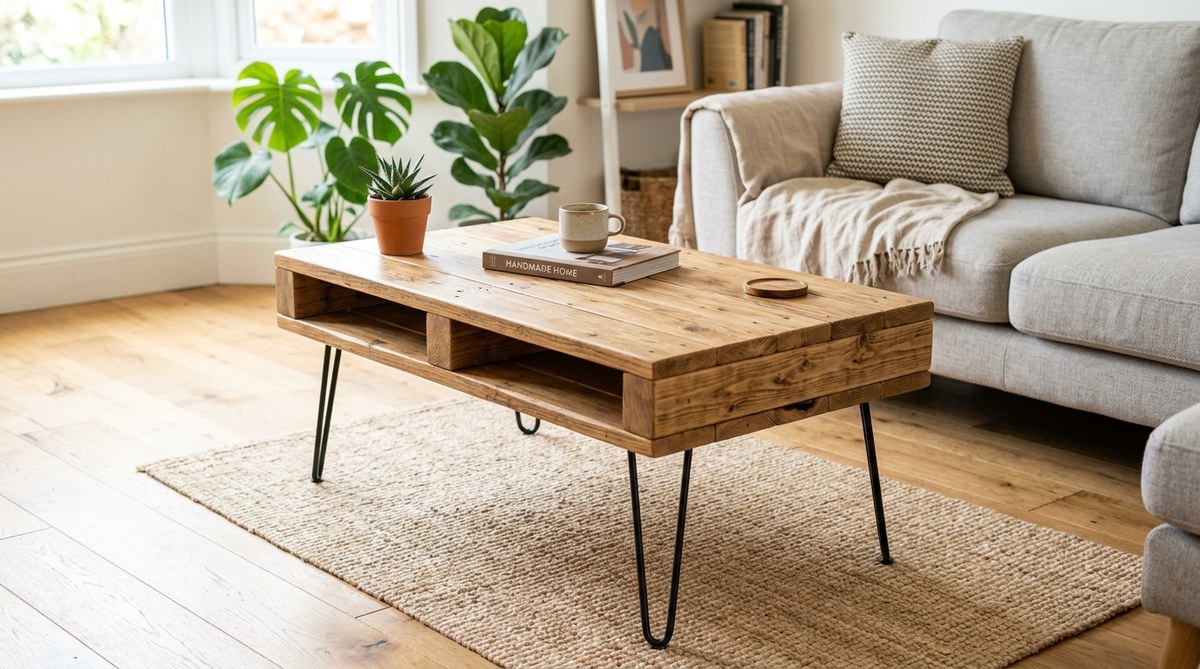
You walk through the lumber aisle and see the price tags. A decent coffee table can cost two hundred dollars or more. But you spot a stack of wooden pallets behind the hardware store. They are free. They are sturdy. And with a little effort, they can become the centerpiece of your living room. Building a DIY pallet coffee table is one of the most satisfying weekend projects you can tackle. It costs almost nothing. It looks great. And you can finish it before Monday morning.
You can build a sturdy, stylish coffee table from a single shipping pallet in about 8 hours of work. The total cost is usually under $20 for hardware and finish. This guide walks you through finding the right pallet, breaking it down safely, assembling the frame, and adding a smooth finish. No advanced woodworking skills are required.
Why a Pallet Coffee Table Makes Sense in 2026
Upcycling is not a trend anymore. It is a smart habit. In 2026, people are more budget conscious than ever. Rent is high. Groceries are expensive. Spending a weekend building furniture with reclaimed materials saves real money. A pallet coffee table also brings a warm, rustic look into your home that matches modern farmhouse decor and industrial styles alike.
Pallets are built to carry heavy loads. The wood is tough. When you select the right pallet and treat it properly, your table will last for years. Plus, every table is unique. The grain, the nail holes, the slight variations in plank width. No two pieces look the same.
What You Need Before You Start
Gather these items before you touch a single board. It keeps the project moving and prevents frustration.
Tools
- Hammer or pry bar
- Circular saw or handsaw
- Sander (orbital sander is best) or sandpaper and a block
- Drill with screwdriver bits
- Tape measure
- Clamps (helpful but not required)
- Safety glasses and work gloves
Materials
- One standard shipping pallet (48 x 40 inches is common)
- 1 1/4 inch wood screws (about 40 screws)
- Wood glue
- Sandpaper (80, 120, and 220 grit)
- Stain, paint, or clear polyurethane finish
- Furniture pads for the bottom of the legs
Finding the Right Pallet
Not every pallet is safe for indoor furniture. Look for pallets stamped with HT (heat treated). Avoid pallets marked MB (methyl bromide). That chemical is dangerous to bring inside your home. Check that the boards are not cracked or rotted. Give the pallet a sniff. If it smells like chemicals or diesel, skip it.
Many hardware stores, grocery stores, and feed supply shops give pallets away. Ask a manager before you take one. Never take pallets from behind a store without permission.
How to Break Down a Pallet Safely
This is the part that scares most beginners. Pallets are held together with spiral shank nails. They do not pull out easily. But there is a method that works.
- Remove the inner support blocks first. These are the thick wooden cubes between the deck boards. Use a pry bar to split them away from the stringers (the long runners). This releases tension.
- Work from the bottom. Flip the pallet over. Insert your pry bar under a deck board near a nail. Rock it back and forth gently. Do not yank hard. Let the nail loosen.
- Use a hammer to push the board back down. If a board starts to crack, stop. Drive the nail back through from the top side and try a different angle.
- Save the stringers. The long 2×4 pieces that run the length of the pallet are perfect for the table legs and frame.
Be patient. Cracking a few boards is normal. You only need enough good wood to build the table top and legs. A single pallet usually gives you 8 to 10 solid deck boards and three long stringers.
Building the Pallet Coffee Table Step by Step
Step 1: Prepare the Wood
Sand every board that will be visible. Start with 80 grit to remove rough spots and dirt. Move to 120 grit for a smooth surface. Finish with 220 grit for a silky feel. Pay extra attention to the edges. Pallet wood splinters easily. Round the corners slightly with the sander.
Wipe away all dust with a damp cloth. Let the wood dry completely before assembly.
Step 2: Build the Table Top
Lay your deck boards side by side on a flat surface. Arrange them so the grain flows in the same direction. Leave a small gap between each board. About 1/8 inch is perfect. This gap allows the wood to expand and contract with humidity.
Cut two cross supports from a stringer. Each support should be about 4 inches shorter than the width of your table top. Place them across the back of the boards. One near the top edge. One near the bottom edge.
Pre drill holes through the cross supports into the deck boards. This prevents the wood from splitting. Apply wood glue to the joint. Drive screws through the supports into each board. Use two screws per board per support.
Step 3: Build the Apron and Legs
Cut two stringer pieces for the long sides of the apron. Cut two more for the short sides. The apron sits underneath the table top and hides the cross supports. It also gives the table a thicker, more finished look.
Attach the apron pieces to the cross supports with screws and glue. Make sure the apron sits flush with the edges of the table top.
For the legs, cut four pieces from the remaining stringer. Each leg should be about 16 to 18 inches tall. This gives a standard coffee table height. Sand the legs well.
Attach each leg to the inside corner of the apron. Use three screws per leg. Pre drill and countersink the screw heads so they sit flush.
Step 4: Add a Lower Shelf (Optional but Nice)
A lower shelf gives you extra storage for magazines, books, or a basket of blankets. Cut four more deck boards to fit between the legs. Attach them to the legs with small angle brackets or by screwing into the sides of the legs.
The shelf should sit about 4 inches above the floor. This keeps it visible and useful without looking cluttered.
Finishing Your Pallet Coffee Table
The finish protects the wood and makes the table look intentional. You have several good options.
| Finish Type | Look | Difficulty | Durability |
|---|---|---|---|
| Clear polyurethane | Natural wood color, slight sheen | Medium | High, water resistant |
| Wood stain | Warm tone, visible grain | Medium | High when sealed |
| Chalk paint | Matte, solid color | Easy | Medium, needs top coat |
| Whitewash | Light, beachy look | Easy | Medium |
Apply the finish in a well ventilated area. Use a foam brush or a clean rag. Let each coat dry fully before sanding lightly with 220 grit and applying the next coat. Two coats of polyurethane or three coats of paint are standard.
Expert advice: Do not skip the sanding between coats. It knocks down the raised grain fibers and gives you a glass smooth surface. This one step separates a good table from a great one.
Common Mistakes and How to Avoid Them
- Skipping the HT check. A pallet treated with methyl bromide is not safe for indoor use. Always look for the stamp.
- Forcing boards apart. If a board cracks, stop. Use a different board or cut the nail head off with a sawzall.
- Not pre drilling holes. Pallet wood is brittle. Screws will split the wood without a pilot hole.
- Using drywall screws. They snap under lateral stress. Use deck screws or cabinet screws.
- Rushing the sanding. Pallet wood is rough. Spend at least 30 minutes sanding. Your hands will thank you later.
Personalizing Your Table
A DIY pallet coffee table is a blank canvas. You can make it your own with a few simple additions.
- Casters on the legs make the table easy to move for cleaning.
- A glass top protects the wood and gives a modern look.
- Drawers can be added to the apron for hidden storage.
- LED strip lights under the lower shelf create a soft glow at night.
If you enjoy this style of project, you might also like learning how to Upcycling changes the way you see old furniture. A scratched dresser becomes a bathroom vanity. A worn headboard becomes a bench.
Safety First
Wear gloves when handling pallets. Splinters are not a joke. Wear a dust mask when sanding. Pallet dust can be irritating. Cut away from your body. Keep your fingers clear of the saw blade. These are simple rules, but they prevent trips to urgent care.
Putting It All Together
Here is a summary of the whole process in a list:
- Find an HT stamped pallet and get permission to take it.
- Break it down with a pry bar and hammer.
- Sand every board until smooth.
- Cut deck boards to length for the top.
- Attach cross supports and apron.
- Build and attach legs.
- Add a lower shelf if you want.
- Apply your chosen finish.
- Attach furniture pads to the bottom of the legs.
- Place it in your living room and enjoy.
Your Weekend Project Awaits
Building a DIY pallet coffee table does not require a workshop full of tools or years of experience. It requires one free pallet, a few hours of focused work, and the willingness to try. The result is a piece of furniture that you built with your own hands. It will hold your coffee mug, your remote control, and your stack of magazines. And every time you look at it, you will remember the weekend you made something from nothing.
Start by checking behind your local hardware store tomorrow. You might find the perfect pallet waiting for you.