
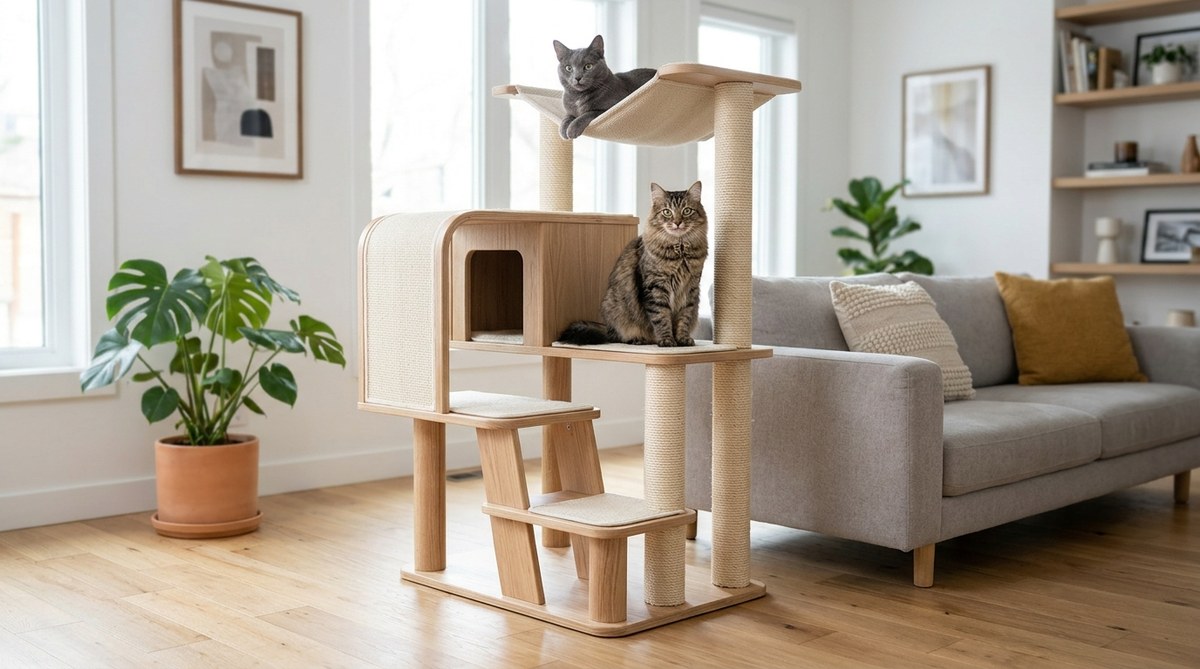
Your living room looks exactly how you want it. Neutral tones, clean lines, maybe a mid-century console or a cozy boho corner. Then the cat tree arrives. It is a carpet-covered behemoth in shades of beige and gray that clashes with everything you own. You love your cat, but you also love your home. The good news is you do not have to choose between them. Building your own cat tree lets you control every inch of the design, from the stain color on the wood to the fabric on the perches. It is a weekend project that keeps your cat happy and your decor intact.
A custom cat tree is one of the most rewarding weekend projects you can take on. You save money, avoid ugly store-bought designs, and build something that fits your space perfectly. Focus on solid wood bases, stainable or paintable materials, and fabrics that match your existing furniture. Your cat gets a playground. Your room stays beautiful.
Why a Store-Bought Cat Tree Never Fits
Walk into any pet store and you will see the same few styles. Gray carpet, brown rope, maybe a dangling toy. They are built for function, not form. Most are covered in synthetic carpet that collects hair and looks worn after six months. The platforms are often too small for a larger cat. The colors are limited to whatever the manufacturer chose that year.
When you build your own, you solve every one of these problems. You pick the wood species, the finish, the fabric, and the exact height. You can match your baseboards or your sofa. You can make the platforms wide enough for a Maine Coon or low enough for a senior cat. And you can do it for less than what a mid-range store-bought tree costs.
Planning Your DIY Cat Tree Decor Project
Before you pick up a saw, you need a plan. The planning phase is where you make all the design decisions that will keep your cat tree from looking like an eyesore.
Measure Your Space
Grab a tape measure and look at the corner or wall where the tree will live. You need three numbers:
- The floor space available (width and depth)
- The ceiling height (if you want a floor-to-ceiling model)
- The height of your nearby furniture (so the tree does not tower awkwardly)
A tree that stands 5 feet tall looks great in a room with 9-foot ceilings. In a room with 8-foot ceilings, it can feel overwhelming. Scale the height to match the room.
Choose a Style That Matches Your Room
Think about the dominant style in your home. Here are a few directions you can take:
- Scandinavian minimalist: Light birch plywood, white painted posts, simple geometric platforms
- Mid-century modern: Walnut-stained wood, tapered legs, warm orange or mustard fabric cushions
- Farmhouse: Reclaimed pine, black iron pipe supports, linen-colored perches
- Boho: Natural branches, macrame hammocks, woven baskets as hideouts
- Industrial: Black steel pipe frames, dark stained wood, gray wool fabric
Pick one style and stick with it. Mixing too many looks can make the tree feel like a craft project instead of a piece of furniture.
Decide on Features
Your cat has preferences. Watch where they spend their time. Do they love high perches by the window? Do they hide in boxes? Do they scratch the corners of your sofa?
List the features you want to include:
- Scratching posts wrapped in sisal rope
- A cozy cubby or enclosed box
- A top perch with a view
- Ramps or bridges between levels
- Hanging toys or a hammock
Limit yourself to three or four levels for a first build. A simple, well-built tree is better than a wobbly tower that tries to do too much.
Materials That Look Good and Last Long
The materials you choose determine both the look and the lifespan of your cat tree. Store-bought trees use particleboard and cheap carpet. You can do much better.
Wood Choices
- Plywood: Use Baltic birch or cabinet-grade plywood. It is strong, resists warping, and takes paint or stain beautifully. Cut circles, squares, or organic shapes for the platforms.
- Solid pine: Affordable and easy to work with. Pine dents more easily than hardwood, but it looks great with a rustic or farmhouse finish.
- Hardwood (oak, maple, walnut): More expensive, but it will last for decades. Use hardwood for the base and main posts if your budget allows.
Post Materials
- PVC pipe: Lightweight and cheap. Wrap it in sisal rope for scratching. Not the most premium look, but it works.
- Wooden dowels or closet rods: A 2-inch diameter wooden dowel is strong enough for most cats. Sand it smooth and stain it to match the platforms.
- Black iron pipe: Perfect for an industrial look. Heavy and extremely durable. Use floor flanges to secure it to the base.
Fabrics and Finishes
- Faux fur or wool blend: Use for the top of platforms. Choose a color that coordinates with your sofa or rug.
- Sisal rope: Natural color blends with most decor. You can dye it with fabric dye if you want a specific hue.
- Carpet tiles: Cut them to size and attach with adhesive. They are easy to replace when they wear out.
Tools You Will Need
- Circular saw or jigsaw
- Drill with screwdriver bits
- Sandpaper (80, 120, and 220 grit)
- Measuring tape and level
- Staple gun
- Wood glue and screws
If you are new to woodworking, check out our guide on top 10 essential tools for successful DIY home projects before you start buying supplies.
Step-by-Step Build Process
Follow these steps to build a custom cat tree that looks like it came from a design catalog.
1. Cut Your Platforms
Start with your plywood or solid wood. Cut three to four platforms in graduated sizes. A good set might be:
- Base platform: 24 inches by 18 inches
- Middle platform: 18 inches by 14 inches
- Top platform: 16 inches by 12 inches
- Optional side platform: 12 inches by 12 inches
Round the corners with a jigsaw or leave them square for a modern look. Sand every edge until smooth. Cats will rub against these edges, so no sharp corners.
2. Sand and Finish the Wood
Sand each piece with 120 grit, then 220 grit. Wipe away the dust with a tack cloth. Apply your finish:
- Paint: Use a low-VOC interior paint. Two coats with light sanding between them.
- Stain: Apply with a rag, wipe off excess, let dry. Seal with a clear polyurethane for durability.
- Natural oil: Danish oil or tung oil gives a matte, natural look. Reapply every year.
3. Assemble the Base
The base needs to be heavy enough that the tree will not tip over. Attach your main post to the center of the base platform using wood glue and screws. For extra stability, add a second layer of plywood to the base or attach a heavy metal plate underneath.
4. Wrap the Posts with Sisal Rope
Apply a line of wood glue along the top of the post. Press the rope into the glue and start wrapping tightly. Keep each coil flush against the previous one. Use a staple gun to secure the rope at the top and bottom. Wrap the entire post from top to bottom, or leave a section bare if you want a wood accent.
5. Attach the Platforms
Work from bottom to top. Screw each platform into the post from underneath. Use a level to check that each platform is straight. For a multi-post design, add cross braces between posts for stability.
6. Add Soft Surfaces
Cut your fabric or carpet to match each platform. Leave an extra inch on all sides. Staple the fabric to the underside of the platform, pulling it tight. Trim any excess.
7. Secure the Tree to the Wall
This step is not optional. Even a heavy base can tip if your cat leaps from the top. Use a furniture anchor strap to secure the tree to the wall. It takes five minutes and prevents a serious accident.
Common Mistakes to Avoid
Even experienced DIYers make errors on their first cat tree. Here is a table of the most common problems and how to fix them.
| Mistake | Why It Happens | The Fix |
|---|---|---|
| Wobbly structure | Posts are not secured tightly to the base | Add corner brackets or a larger base plate |
| Platforms are too small | Cat cannot turn around comfortably | Make platforms at least 16 inches wide |
| Fabric frays at edges | No hem or binding was used | Fold fabric under before stapling, or use a fabric glue seam |
| Sisal rope unravels | Ends were not glued or stapled | Apply super glue to the rope end and press it flat |
| Tree tips over | Base is too light or cat jumps hard | Add weight to the base or anchor to the wall |
| Color clashes with room | No planning before building | Test paint or stain on scrap wood first |
Adding Decor Touches That Make It Shine
A plain wood platform is functional. Adding a few design details turns it into a statement piece.
- Paint the edges a contrasting color: A white platform with a black edge looks graphic and intentional.
- Add a small shelf below a platform: Store a small plant or a book on the lower shelf. Your cat will not bother it if the shelf is out of reach.
- Use woven baskets as cubbies: Cut a hole in the side of a round basket and mount it between two posts. It becomes a hideout that looks like decor.
- Hang a small macrame piece: A tiny macrame plant holder with a fake plant adds boho texture without taking up floor space.
- Match the hardware to your room: Use brass screws or black iron brackets that match your cabinet pulls and light fixtures.
For more ideas on blending function with style, take a look at our article on transform your living space with simple DIY home decor projects.
Safety Checks Before Letting Your Cat Use It
Your cat will test every joint and seam. Run through this checklist before you introduce them to the tree.
- Shake the tree firmly. Does anything rattle or shift? Tighten all screws.
- Check every staple. Are any sticking out? Push them in or remove them.
- Run your hand over every edge. Is there a rough spot? Sand it smooth.
- Pull on the sisal rope. Does it move? Add more staples.
- Test the wall anchor. Give it a hard tug. It should not budge.
A cat tree that is not anchored to the wall is a hazard. Cats climb fast and jump hard. A falling tree can injure your cat or break something in your home. Always secure it, even if you think the base is heavy enough.
Budget Breakdown: DIY Versus Store-Bought
Let us talk money. A decent store-bought cat tree runs between $150 and $400. A premium designer model can cost $800 or more. Here is what a DIY version costs using quality materials.
- Plywood for platforms: $25 to $40
- Wooden posts or PVC pipe: $10 to $20
- Sisal rope (100 feet): $15 to $25
- Fabric or carpet: $15 to $30
- Stain or paint: $10 to $20
- Screws, glue, staples: $10
- Wall anchor kit: $8
Total: $93 to $153. You save at least $50, and you get a tree that matches your exact taste. If you already own most of the tools, the savings are even bigger.
Making It Work for Multiple Cats
If you have more than one cat, your tree needs a few adjustments. Cats are territorial about vertical space. They need multiple routes to the top so one cat cannot block the other.
- Build two posts instead of one
- Add a wide platform at the midpoint where both cats can sit
- Include a tunnel or cubby on each level
- Make the base extra wide to prevent tipping
A multi-cat tree is essentially two trees joined by a bridge or a large platform. Keep the design symmetrical for a cleaner look.
Your Cat Tree, Your Rules
You have the skills and the plan. A weekend of work gives you a piece of furniture that your cat loves and your guests admire. The best part is that you can change it later. Swap out a worn cushion. Add a new platform. Repaint it when you redecorate. A DIY cat tree grows with your home.
If you enjoyed this project, you might also like learning how to build a custom dog bed frame in one afternoon or trying out 5 trendy DIY projects to try in 2026 for other parts of your home.
Making Your Cat Tree Last for Years
Build it well the first time, and you will not need to replace it. Store-bought trees wear out in two or three years. A custom tree built from solid wood and quality materials can last a decade or more. When the sisal rope gets fuzzy, unwrap it and put on fresh rope. When the fabric stains, staple on a new piece. The wood frame stays solid.
Your cat will use this tree every single day. They will scratch it, nap on it, and watch the world from the top perch. Give them something that looks as good as the rest of your home. You both deserve it.