
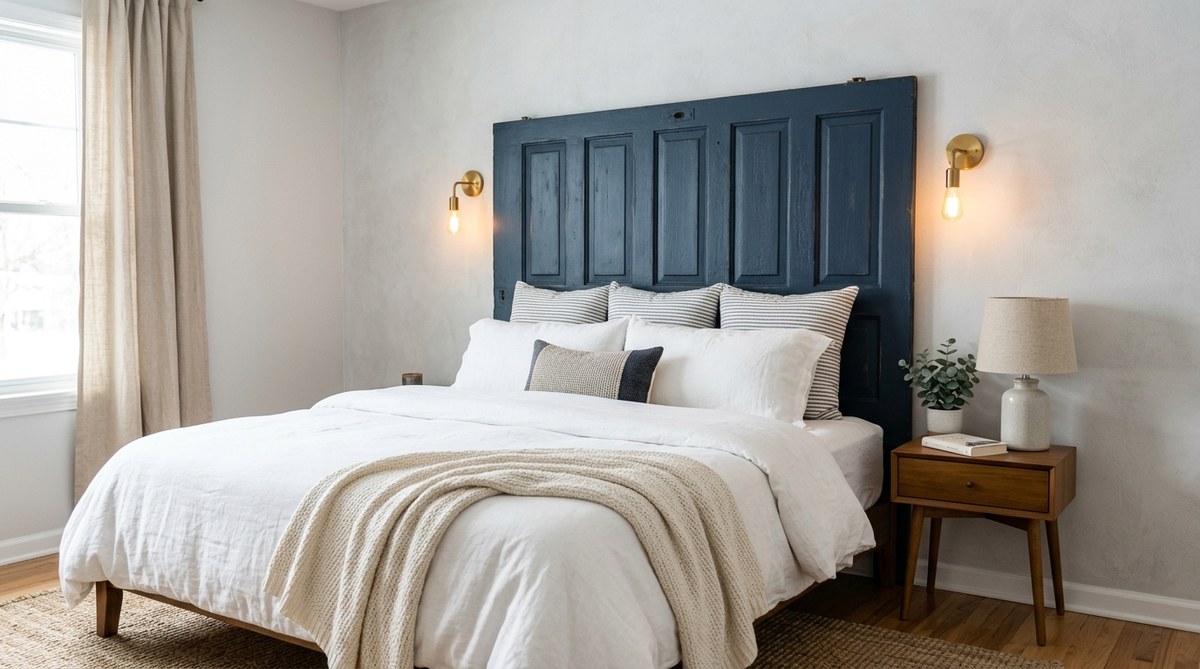
A solid wood door can cost you next to nothing at a salvage yard or Habitat for Humanity ReStore. But once you clean it up, add some legs, and mount it behind your bed, that same door becomes the centerpiece of your entire bedroom. It is a weekend project that gives you a one of a kind look without spending hundreds on new furniture. And the best part? You do not need a workshop full of tools to pull it off.
A salvaged door makes an instant, affordable headboard with rustic or farmhouse appeal. You need basic tools like a saw, sandpaper, and a drill. Choose a door that matches your bed width. Sand, prime, and paint or stain it. Attach furniture legs or mount it directly to the wall. Total cost often stays under $75, and you finish in one weekend.
Why an Old Door Works So Well as a Headboard
Doors are built to last. They are thick, sturdy, and often made from solid wood that you just cannot find in modern flat pack furniture. A hollow core door from the 1950s still has more character than anything you would buy at a big box store today. The panels, the raised details, and even the old paint layers all add texture that feels intentional.
A DIY headboard from old door also solves a practical problem. Most beds look unfinished without something behind them. A headboard anchors the room and protects your wall from scuffs. Using a door means you get that function plus a conversation piece. Guests will ask where you bought it. You get to say you made it.
Choosing the Right Door for Your Bed
Not every door will work. You need to match the door width to your bed size. A twin bed needs a door about 39 inches wide. A full bed needs 54 inches. Queen beds require 60 inches, and king beds need 76 inches. Standard interior doors are usually 30 or 32 inches wide, which works for a twin but not much else. Look for wider doors like exterior doors or French door panels if you have a queen or king.
Check for these qualities before you buy:
- Solid wood construction (avoid hollow core doors if you want durability)
- Flat or slightly raised panels (too much detail can look busy)
- No major rot or water damage
- Straight edges that are not warped
- Old paint or varnish is fine (you will sand it off)
If you find a door with original glass panes, you can use those too. Just remove the glass carefully and replace it with a mirror or leave it open for a decorative look.
Tools and Materials You Will Need
Gather everything before you start. Running to the hardware store mid project kills momentum. Here is what you need:
- Sandpaper (80 grit, 120 grit, and 220 grit)
- Orbital sander (optional, but saves time)
- Primer and paint or wood stain and polyurethane
- Paintbrushes and a foam roller
- Measuring tape and a level
- Circular saw or handsaw (for trimming the door height)
- Furniture legs or a mounting bracket kit
- Screws, wall anchors, and a drill
- Wood filler (for holes or cracks)
- Drop cloth and painter’s tape
If you want to mount the headboard directly to the wall without legs, pick up a heavy duty French cleat system. It holds more weight and keeps the door flush against the wall.
Step by Step Process for Your DIY Headboard from Old Door
1. Clean and Strip the Door
Start by washing the door with a mix of warm water and mild dish soap. Scrub off dirt, cobwebs, and loose paint. Let it dry completely. If the door has multiple layers of old paint, use a chemical stripper or a heat gun to remove the bulk of it. Wear a mask and work in a well ventilated space. Old paint may contain lead, so test it with a lead testing kit before you sand.
2. Sand Everything Smooth
Once the door is clean and dry, sand the entire surface. Start with 80 grit to remove old finish and rough spots. Move to 120 grit for smoothing, then finish with 220 grit for a silky feel. Pay extra attention to the edges and panel grooves. A smooth surface helps paint or stain look professional.
3. Fill Holes and Cracks
Old doors have holes from hinges, doorknobs, and lock sets. Fill those with wood filler. Use a putty knife to press the filler deep into the holes. Let it dry according to the package instructions, then sand those spots smooth with 220 grit. If you want to keep the original doorknob hole for a vintage look, leave it as is and clean up the edges.
4. Trim the Door to Size
Measure the height you want. Most headboards look best when they extend 12 to 24 inches above the mattress. Mark your cut line with a straight edge and a pencil. Use a circular saw with a fine tooth blade for a clean cut. If you do not own a saw, most hardware stores will cut the door for a small fee. Sand the cut edge after trimming.
5. Prime and Paint or Stain
Apply a high quality primer to the entire door. This blocks stains and helps paint stick. Let it dry, then lightly sand with 220 grit. Wipe off dust with a tack cloth. Now apply your paint or stain. For a rustic look, use a matte finish paint in a neutral color like off white, sage green, or charcoal. For a more natural look, use a wood stain and seal with polyurethane. Apply two to three thin coats, sanding lightly between each coat.
6. Attach Legs or Mounting Hardware
You have two options here. The first is to attach furniture legs. Buy four metal or wooden legs from a hardware store. Screw them into the bottom edge of the door using heavy duty brackets. Make sure the legs are evenly spaced and the same height. This method lets you lean the headboard against the wall or bolt it to the bed frame.
The second option is wall mounting. Use a French cleat or heavy duty picture hangers. Mark the studs in your wall, then screw the cleat into the door and the wall. This keeps the headboard completely flat against the wall and works well if your bed frame has its own headboard brackets.
7. Position and Secure the Headboard
Move the headboard into place behind your bed. Use a level to check it. If you used legs, screw them into the bed frame or use L brackets to secure them to the wall. If you used a French cleat, slide the door down onto the wall cleat until it locks. Give it a gentle tug to make sure it is secure.
Common Mistakes and How to Avoid Them
| Mistake | Why It Happens | How to Fix It |
|---|---|---|
| Door is too wide for the bed | You did not measure the bed width first | Measure your mattress width and buy a door that matches within 2 inches |
| Headboard wobbles | Legs are uneven or not secured | Use a level and shim the legs, or switch to wall mounting |
| Paint peels after a few months | You skipped primer or did not sand | Always prime bare wood and sand between coats |
| Door looks too heavy for the wall | You used drywall anchors instead of studs | Always screw into wall studs for heavy doors |
| Old smell or dust keeps coming back | You did not seal the door properly | Apply a clear polyurethane coat to trap odors and dust |
Expert tip from a furniture restorer: “Always test your stain or paint color on the back of the door first. Old wood absorbs finish differently than new wood. A test patch saves you from repainting the whole thing.”
Finishing Touches to Make It Your Own
Your DIY headboard from old door does not have to stop at paint and legs. Add small details to make it feel custom.
- Stencil a pattern or quote onto the door panels
- Attach small hooks for hanging lights or jewelry
- Add crown molding to the top edge for a furniture look
- Use chalk paint for a matte, distressed finish
- Install LED strip lights behind the headboard for a soft glow
If you enjoy upcycling projects, this headboard pairs well with other reclaimed decor. Try matching it with a nightstand made from a crate or a dresser you refinished.
How This Project Saves You Money
A new headboard from a furniture store costs anywhere from $200 to $800. A solid wood door from a salvage yard usually runs between $15 and $50. Add another $20 for paint and supplies, and maybe $15 for legs. You can complete this project for under $75. That is a savings of at least 60 percent compared to buying new.
Plus, you are keeping a piece of old architecture out of a landfill. That matters if you care about sustainable living.
When to Call This Project Done
You might be tempted to keep adding details. That is fine. But know when to stop. A headboard should look intentional, not cluttered. If the door has beautiful natural wood grain, let it shine with a clear coat. If the paint is smooth and even, step back and enjoy it. Sometimes the best design choice is knowing when to stop.
Your Next Weekend Project Starts Here
A salvaged door is waiting for you at a local reuse store or on Facebook Marketplace. Pick one up this weekend. Sand it down. Give it a fresh coat of paint. Mount it behind your bed. In two days, you will have a headboard that looks like it cost a thousand dollars but actually cost less than a dinner out.
If you want more ideas for transforming your space with reclaimed materials, check out our guide on Transform Your Space with Simple DIY Wall Art Ideas. Or if you are building out your tool collection, read our Top 10 Essential Tools for Successful DIY Home Projects. Every project you finish builds your confidence for the next one.