
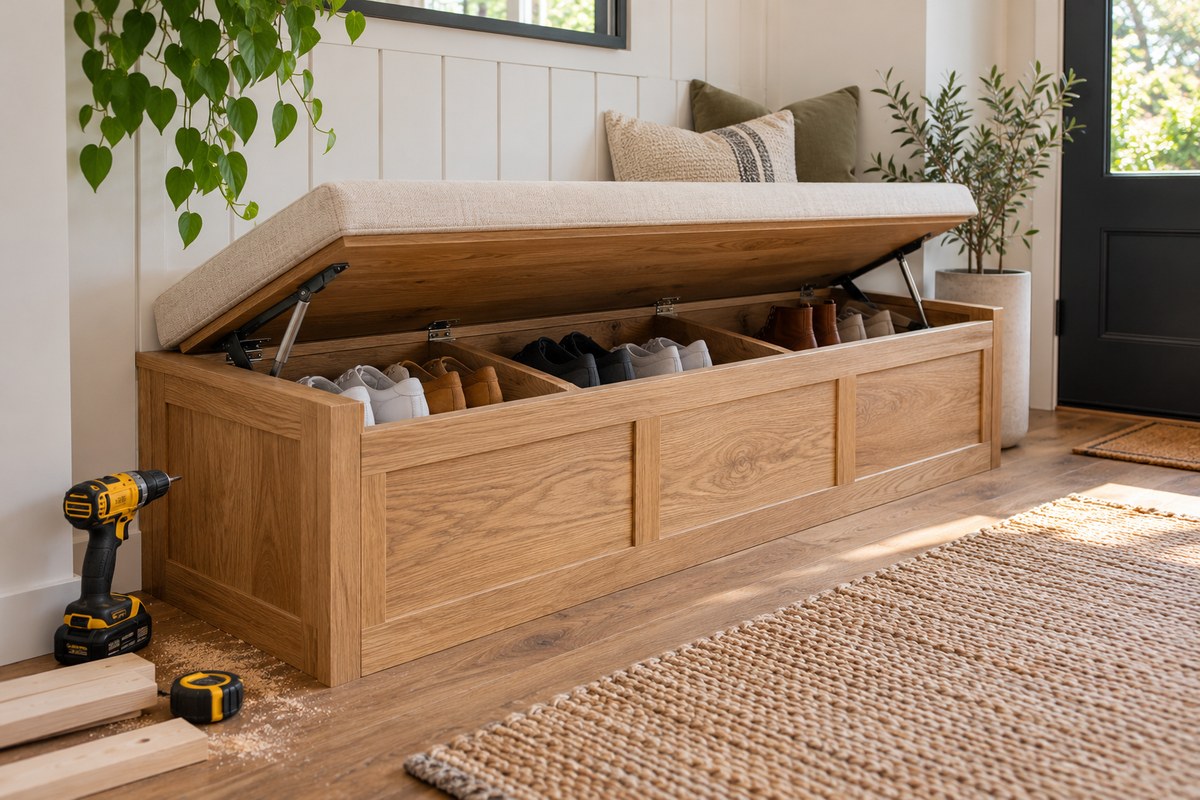
Your entryway is the first thing you see when you walk in the door. It is also the place where shoes, bags, and mail seem to multiply overnight. A custom bench that hides your shoes solves both problems at once. You get a spot to sit while you pull off your boots, and you keep the clutter out of sight. This project is designed for a weekend, even if you are new to woodworking. With basic tools and a trip to the lumber yard, you can build a piece that looks like it came from a high end furniture store.
This guide gives you a complete plan for a diy entryway bench with shoe storage that you can finish in one weekend. You will learn how to size the bench for your space, pick the right plywood, build a hidden cubby system, and add a comfortable top. The result is a custom piece that costs less than a store bought alternative and fits your home perfectly.
Why a Hidden Shoe Bench Works for Small Entryways
Most homes in the United States have a narrow hallway or a small mudroom off the garage. A standalone shoe rack takes up floor space and still looks messy. A bench with storage underneath hides the visual chaos while giving you a place to sit. You can keep daily shoes inside the bench and store seasonal pairs in a closet. This setup cuts down on the time you spend hunting for a matching shoe before you run out the door.
If you are a renter, you can build this bench as a freestanding piece that does not attach to the wall. That means you can take it with you when you move. Homeowners can anchor it to studs for extra stability, especially if kids will use it. Either way, the design stays the same.
Materials and Tools You Will Need
Before you head to the hardware store, measure your entryway. A typical bench is 48 inches wide, 18 inches deep, and 18 inches tall. Adjust these numbers if your space is different. The hidden storage compartment sits under the seat and uses a hinged lid or a sliding drawer system. For this plan, we will use a hinged top for simplicity.
Lumber and Hardware
- 3/4 inch plywood (birch or sanded pine) for the main box and lid
- 1×4 pine boards for the face frame and trim
- 2×2 lumber for the inner support frame
- Wood glue and 1 1/4 inch pocket hole screws
- Two heavy duty lid stay hinges
- Magnetic catch or latch
- Sandpaper in 80, 120, and 220 grit
- Wood filler and primer
- Paint or stain of your choice
Tools
- Circular saw or table saw
- Drill and driver bits
- Pocket hole jig
- Clamps
- Tape measure and square
- Sander or sanding block
If you do not own a pocket hole jig, you can use simple butt joints with glue and screws. The joinery will still be strong enough for a bench. For a full list of essential gear, check out our guide on top 10 essential tools for successful diy home projects.
Step by Step Build Process
Follow these numbered steps to move from raw plywood to a finished bench.
-
Cut the plywood box pieces. You need two side panels, a back panel, a bottom panel, and a front panel. For a 48 inch wide bench, cut the sides at 18 inches tall by 18 inches deep. Cut the back and front at 48 inches wide by 18 inches tall. Cut the bottom at 48 inches wide by 18 inches deep. Use a square to check every corner.
-
Assemble the box. Attach the sides to the back panel using glue and screws. Then add the bottom panel. Finally, attach the front panel. Make sure everything is square before the glue sets. Clamp the assembly and let it dry for an hour.
-
Build the inner support frame. Cut 2×2 pieces to create a grid inside the box. This frame supports the weight of people sitting on the bench. Space the supports every 16 inches across the width. Attach them to the bottom panel with glue and screws.
-
Build the lid frame. Cut a piece of plywood to match the top dimensions of your box (48 inches by 18 inches). Add a 1×4 trim around the edges to create a picture frame look. The trim hides the raw plywood edge and gives the lid a thicker appearance.
-
Attach the hinges. Screw the lid stay hinges to the back edge of the box and the underside of the lid. These hinges hold the lid open so you can access shoes without holding it up. Add a magnetic catch to the front edge to keep the lid closed.
-
Sand and finish. Sand the entire bench with 80 grit to remove rough spots. Move to 120 grit, then 220 grit for a smooth surface. Fill screw holes with wood filler and sand again. Apply primer, then paint or stain. Two coats of paint give a durable finish that can handle daily use.
Common Mistakes and How to Avoid Them
Even experienced DIYers make small errors that cost time. The table below lists the most frequent mistakes and the fix for each one.
| Mistake | Why It Happens | The Fix |
|---|---|---|
| Box is not square | Uneven cuts or loose clamps | Measure diagonals before glue dries. Adjust clamps until both diagonals are equal. |
| Lid does not fit flush | Warped plywood or wrong hinge placement | Use a straightedge to check the lid. Sand high spots or adjust the hinge position. |
| Storage space is too shallow | Box depth is less than shoe length | Make the box at least 18 inches deep. Most adult shoes fit in 16 to 18 inches. |
| Bench wobbles on uneven floor | Floor is sloped or legs are not level | Add adjustable furniture glides to the bottom corners. |
| Paint chips off quickly | Skipped primer or rough sanding | Always prime bare wood. Sand between coats for better adhesion. |
Customization Ideas for Your Space
A plain bench works, but small tweaks make it feel built in. Here are a few ways to personalize your build.
- Add a cushion. Cut a piece of 2 inch foam to match the lid size. Wrap it in fabric and staple it to a thin plywood base. Set the cushion on top of the lid for extra comfort.
- Include cubby dividers. Instead of one open compartment, install vertical dividers inside the box. Each family member gets their own cubby. This keeps shoes separated and makes mornings easier.
- Use a different hinge style. If you prefer a drawer, build a shallow drawer box and mount it on full extension slides. The bench top stays fixed, and you pull the drawer out to grab shoes.
- Paint a pattern. Use painter’s tape to create stripes or a geometric design on the front panel. This gives the bench a custom look without extra carpentry.
For more ideas on maximizing small spaces, read our article on easy diy storage solutions for small spaces.
How to Organize the Inside of Your Bench
The hidden storage is only useful if you keep it organized. A pile of shoes thrown into a dark box defeats the purpose. Use these strategies to maintain order.
- Install a small LED strip light on the inside of the lid. Wire it to a battery pack with a pressure switch. When you lift the lid, the light turns on automatically.
- Place a shallow tray or a piece of shelf liner on the bottom. Dirt and pebbles fall off shoes and collect on the liner. Pull the liner out and shake it clean once a week.
- Store off season shoes in clear bins inside the bench. Label each bin with the family member name and shoe size. Rotate bins as the seasons change.
“The best storage solution is one that makes daily habits easier. If you have to wrestle with a stuck lid or dig through a dark box, you will stop using the storage altogether. A few small upgrades turn a good bench into a great one.” – Sarah K., furniture builder and DIY instructor
Finishing Touches That Make a Difference
The final details separate a homemade bench from a professional piece. Take an extra hour to do these steps.
- Fill all gaps. Use wood filler on every joint, even the ones that look tight. Sand the filler smooth. A seamless surface looks like a single piece of wood.
- Add base molding. Attach a small piece of quarter round or shoe molding around the bottom edge of the bench. This covers any gap between the bench and the floor and gives it a furniture look.
- Use soft close hinges. Upgrade to soft close lid stays if you want a silent close. These hinges use hydraulic dampers to lower the lid gently. They cost a few dollars more but feel luxurious.
If you want to match your bench to existing decor, consider using the same paint color as your trim or front door. A cohesive color scheme ties the entryway together. For more decorative projects, see our post on transform your living space with simple diy home decor projects.
A Weekend Well Spent
Building a diy entryway bench with shoe storage is one of the most rewarding weekend projects you can tackle. It solves a real problem in your home, saves you money, and gives you a skill you can use again. The first time you sit down to tie your shoes and see the clutter disappear behind a clean lid, you will know it was worth the effort.
Gather your materials on a Friday night. Cut and assemble the box on Saturday morning. Sand and paint on Saturday afternoon. Let it dry overnight, and install the hinges on Sunday. By Sunday evening, you will have a custom bench that makes your entryway feel twice as big and twice as organized.
Start with this plan, but do not be afraid to adjust the dimensions or add your own flair. Every home is different, and your bench should fit your life. If you run into a problem, step back and look at the structure. Most issues come down to square cuts and firm clamps. You have the tools and the guide. Now go build something great.