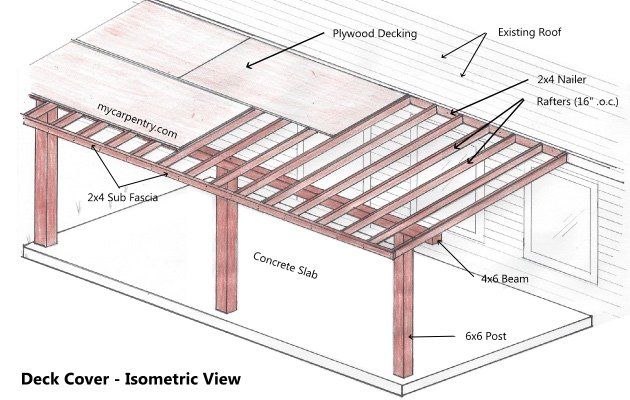
Detailed guide on building a back deck patio cover
These patio cover plans describe how I built my own patio cover. There are many ways to build a patio cover; every situation is different. These plans are intended to provide you with some useful insight, while you are designing and building a patio cover for your own home.
Assumptions and Considerations
Before building this patio cover, it is assumed that you already have a patio slab or deck that you are wanting to cover. Our house came with a 10′ x 10′ patio slab. We extended ours to make it approximately 10′ x 20′.
These patio cover plans assume that the existing structure is capable of supporting a new patio cover roof in the manner described below. If you have any doubts, you should consult a structural engineer.
Special note: These plans are not intended to replace engineered working drawings. Local building codes can vary significantly among the regions. Your local building code should determine the actual sizes of concrete footings, slabs, wood structural members, and fasteners to be used. A structural engineer should determine if your existing structure is capable of supporting the additional load factors of a patio cover. Before beginning construction, contact your building permitting authorities to obtain a building permit and to have your design reviewed so that it complies with local building codes and guidelines.
Patio Cover Plans – Design
There were a few features that I wanted to include in my patio cover design. Writing these down before I started sketching the design, and drawing my patio cover plans, helped ensure that I would accomplish all of my goals.
- Wood construction – western red cedar
- Shingles to match the existing residence
- Outside beam height to have a minimum of 6′ 8″ clearance
- Roofing nails should not show through the bottom of the roof decking
- Use 4 x 8 x 5/8″ T 111 4″ O.C. plywood roof decking (for a plank-like visual appearance)
- 6×6 posts
- 4×6 beam
- 2×4 rafters
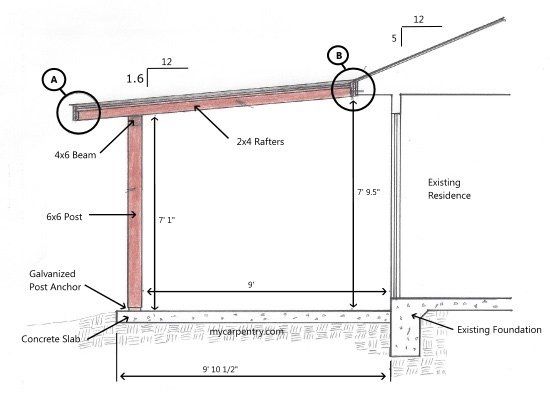
The roof slope needed to meet the minimum recommendations specified by the roofing material manufacturer, but also needed to meet my design requirements – a minimum of 6′ 8″ clearance from the top of the slab to the underside of the 4×6 beam.
A clearance of 80″ between the finished floor and the bottom of the beam made my roof a 1.6/12 pitch. This is below the manufacturers specifications of 2/12 minimum, but I have never had a leak in 12 years. I have had the roof replaced twice, due to hailstorms, but never because it leaked. I don’t recommend going against the manufacturer’s specs, but wanted to share my experiences using fiberglass shingles on a low-pitch roof.
To prevent the roofing nails from showing through the underside of the decking, I used two layers of 4′ x 8′ plywood to deck the roof. The bottom layer was 5/8″ thick T 111 4″ O.C., and the top layer was 3/8″ construction grade (CDX) plywood. This made the roof decking thickness 1″.
Patio Cover Plans – Building
When you are building a patio cover off of an existing roof or wall, you must take all of your measurements from the point at which the patio roof will attach to the existing structure, not the outside of the slab. The slab can vary considerably, throwing off crucial measurements.
Since my patio roof was going to be attached to the existing rafter tails**, I plumbed straight down from the outside surface of the fascia (B) and made a mark on the patio slab. I did this on both ends of where the roof was going to attach.
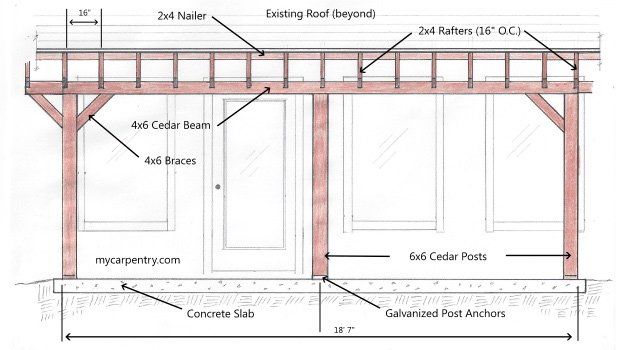
Afterwards, I popped a chalk-line across the patio slab. I used this line to establish the placement of the bottom of the 6×6 posts – they all needed to be the same distance from this line.
I used galvanized post anchors to secure the posts to the slab. Before securing the posts to the anchors, I cut just enough off of the bottoms of each post to make them square and let the other ends run long. I used temporary 2×4 braces to hold the posts plumb, while I determined the post heights.
With the posts plumbed, braced and secured to the galvanized anchors, I measured up 6′ 8″ from the top of the slab and made a mark on the center 6×6 post.
I used a level to extend the mark on the center post to the other two outer posts. This is a great way to ensure that the tops of each post are level and the beam that sits on top of them is also level.
Next, I cut the tops of each post with a circular saw and attached the 4×6 beam, positioned flat, with 8″ x 3/8″ lag screws, allowing it to overhang on each end post 16″.
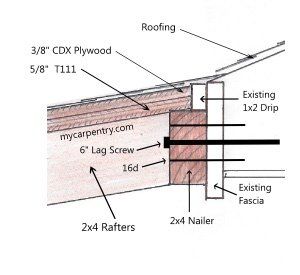
Once the beam was attached to the 6×6 posts, I determined the location of the 2×4 nailer, that attached to the house, using the Pythagorean Theorem. I secured the 2×4 nailer with 16d galvanized deck nails into the house’s fascia and used 6″ x 3/8″ lag screws to secure the 2×4 nailer beyond the fascia, into each of the existing rafter tails.
Once everything was secured, I began the 16″ O.C. layout for the 2×4 rafters. I cut one end of each 10′ rafter with a 1.6/12 pitch cut and attached it to the 2×4 nailer with 2″ galvanized wood screws.
Once the rafters were in place and secured to the 2×4 nailer and the 4×6 beam, I measured from the house along the top of one of the end rafters and made a mark at 9′ 10″. I did the same on the other end rafter and popped a chalk-line across all of the patio cover rafter tails.
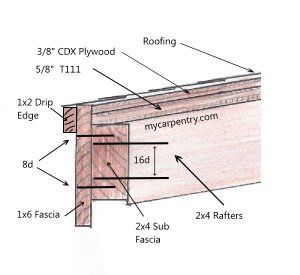
From the chalk line, I marked a 1.6/12 pitch cut on each rafter tail and cut each one with my circular saw. Now that the rafter tails are all the same length, I cut and installed the 2×4 sub fascia with 16d galvanized deck nails.
Next, I installed the two layers of plywood decking. On one of the end rafters, I measured from the house’s 1×2 drip edge down 48″ along the rafter and made a mark on the top of it with my pencil. I did the same thing on the other end rafter.
Using my chalk line, I popped a line from one mark to the other. This established a line for me to use as a guide for my 48″ x 96″ T 111 plywood decking. I attached the T 111 decking with 1 1/2 galvanized wood screws.
For the second layer of 3/8″ CDX plywood, I measured down 24″ on each end of the top of the roof and popped a line across (to stagger the plywood joints). I ripped two pieces of the 3/8″ plywood into two equal pieces measuring 24″ x 96″, and secured the first course of the second layer of plywood along the 24″ chalk line.
Next, I installed 1×6 cedar fascia and 1×2 drip edge on both sides and front of the roof. The fascia and drip edge were secured with galvanized 8d nails.
Next, I installed 15# felt on top of the two layers of plywood and installed the fiberglass roofing to the specifications of the manufacturer.
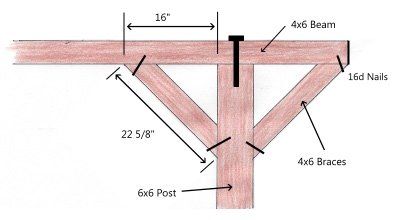
The final step of the roof frame is to install the four corner braces located at each end of the 4×6 beam and the two 6×6 posts at the end. Since each end overhangs 16 inches, you can determine the length of the corner braces using the Pythagorean theorem. The result is four 4×6’s @ 22 5/8″ long from long point to long point with a 45 degree bevel on each end. Secure them with 16d galvanized deck nails.
In addition to roof slope, you also need to take into account rafter span, rafter size, and rafter spacing. Before you can decide on any of the above, you have to know the design load.
If you live in an area where you have frequent heavy snow load, you will need to design your roof accordingly. You can usually determine your roof design load from the building code in your area.
Once you have determined the design load, you can play around with various rafter scenarios using the rafter span tables.
I didn’t have to worry about snow when drawing my patio cover plans, but my two-layer plywood decking added some “dead load” to my design. It is something to be considered.
Using the rafter span tables, I would have exceeded the capacity of my 2×4 rafters if I had spaced them 24″ O.C.., but spacing them 16″ O.C.., I was within the range of my design load.
|
|
| Rafter Tail Detail | Rafter Head Detail |
Also, you can get some design load points since there is a 24″ overhang, which acts as a cantilever and reduces the amount of direct load on the span between the beam and where the rafters attach to the roof of the house. Talk to your structural engineer or architect about the specifics.
